My git svn workflow

My git svn workflow

Git-Logo-2Color
Git Logo by Jason Long /CC BY 3.0

Using a remote subversion repository with git locally requires some adoptions to the local git usage compared to working in a pure git environment. The reason for this is that the remote subversion don’t know about many of the concepts the local git supports (local branches or multiple local commits before checkin for example). Because of this it is essential to make it look as close to a normal svn checkin as possible when using git svn.
As I now work since quite a while with such a setup I defined a workflow for me that don’t causes any problems with the svn and gives me many of the benefits I have with git as there are the possibility to work with the version history offline, making local branches to develop new features or making multiple commits when sub tasks are done.

Before starting to develop a new feature I need to make sure everything is up to date. In contrast to a git remote repository no pull option is available here but I have to rebase the svn repository. I call the following from the master branch:

git svn rebase

This gets any new code changes from the svn and rebases all local work done by me which is not checked in yet on top of it. This is essential because svn history goes in a straight line and would not know what to do if you push a local commit that is dated before the actual newest check in.
After having done that I can create a local feature branch using

git checkout -b newFeature

Here everything works as normal. You can make commits, branch out further, go back to a former version and so on. When you want to get the newest code from the remote repository merged into your branch I prefer pulling it in the master first and rebasing it from there in my featureBranch (it is important not to merge it)

git checkout master

git svn rebase

git checkout featureBranch

git rebase master

When the new feature is ready comes the essential part where the git svn mix breaks sometimes if you don’t do it right. As I mentioned it is essential to make the commit as equal to a svn commit as possible. When using svn you don’t have the possibility to make local commits you just push everything at once to the server where it gets a version id and thats it. To achieve that behaviour with git you change back to the master, checkout the newest code changes and merge it back to the feature branch as explained above. After that we can merge the feature branch back to master:

git checkout master

git merge featureBranch

When you look at the version history now you will see that every commit done in the feature branch is now at the top of the version history. This is because we rebased the master in the feature branch and not merged it. This gives us now the possibility to pack all our local commits to one commit which will then look like the normal subversion workflow to the repository. If we had done 5 commits in our local feature branch for example we achieve this with

git rebase --interactive master~5

This will guide you through two steps. In the first you have to select which of the five commits you want to squash together. Here you should squash all subsequent commits into the first. After that a new dialogue will open which needs you to define the new commit message. Here you see all commit messages you entered in the single commits and can copy the contents to a new single message. When you are done and saved the new message git will rebase everything to one commit which lies on top in the version history. The only thing left to do is push it to svn. Once again the usual git push won’t work here. Instead we call

git svn dcommit

That is all. Everything should work fine and your new feature is checked in to subversion. You can now delete the feature branch or keep to track back the single steps you made to develop the feature.


Update:

Just to clarify, the idea is not to work weeks long on a feature and try to integrate it with a big bang all at once. This was just meant for small features that require just a few hours or maybe a day of work. If you implement a larger feature you obviously should commit smaller portions of your code changes to svn to make your progress clear and reproducible and avoid large merge conflicts with other team mates changes. In the beginning I tried to dcommit all my single commits to svn which worked to a point but had one nearly fatal break. Since then I try to avoid that and use the described workflow.

Checking out a subversion repository with git

Checking out a subversion repository with git

Git-Logo-2Color
Git Logo by Jason Long /CC BY 3.0

Everyone who has worked with git for some time and has to go back to subversion will experience the feeling that subversion is doing so many things wrong and making things unnecessary
complicated. Luckily git comes with a build in svn bridge which enables us to work local with git while on the server side nobody will see a difference to any other svn client.

To start working with git we need to checkout the svn repository. Therefore a empty folder has to be created locally which is not under git control currently. Therefore type on your shell:

mkdir gitTest

After that change to that folder and perform the checkout/clone:

cd gitTest
git svn clone https://192.168.178.1/svn/MyRepo -T trunk -t tags

The IP 192.168.178.1 has to be replaced by the IP of the subversion repository. The option -T trunk -t tags tell git that we want to checkout the trunk only (which is a folder on the svn repository named “trunk”) with the svn tags. For a full clone with all branches etc the option -stdlayout is needed:

git svn clone https://192.168.178.1/svn/MyRepo -stdlayout

After this the git repository is ready to work with. How my workflow with git svn looks like will be topic of the next post.

Veränderungen

Veränderungen

In den letzten Jahren ist einiges passiert. Ich habe meinen Arbeitgeber gewechselt und bin bei einem Consultingunternehmen tätig. Ich habe mich, anschließend an das Vaadin Projekt, weiterhin auf Java/EE und hier vor allem, aber nicht ausschließlich, auf Webapplikationsentwicklung spezialisiert. Nicht aus bleibt dabei natürlich sich mit den diversen JavaScript Frameworks und Toolchains zu beschäftigen. In letzter Zeit kam dann noch Scala als Basis für Reactive Programming hinzu und in der Freizeit beschäftige ich mich aktuell passend dazu mit dem Play Framework Version 2 in Scala, was ein guter Kontrast zu meinem aktuellen beruflichen Projekt ist, wo es um einen Java Desktopclient geht. Ergänzend dazu habe ich seit meiner Masterarbeit das Thema Softwaretests und testbare Architekturen bzw. wie man Software gut und einfach testbar macht und was die Probleme sind weiterverfolgt und das ganze hat sich zu einem Steckenpferd entwickelt mit dem ich mich immer wieder gern mal beschäftige. Hier passt auch Play gut rein und (nicht nur) deswegen steht auch AngularJS noch recht weit oben auf meiner Interessenliste. Diese Themen könnten entsprechend hier demnächst vermehrt aufschlagen.

Zudem habe ich meine persönlichen und beruflichen Computingplattformen nun schon seit einiger Zeit komplett auf Apple gewechselt. Das war nicht zuletzt durch meine guten Erfahrungen mit iOS motiviert, hatte aber auch damit zu tun das mich bei Ubuntu Unity nicht so richtig glücklich gemacht hat und ich davon angenervt war keine Video on demand Dienste nutzen zu können (wegen nicht unterstütztem DRM), wegen der nicht vorhandenen Hardwareunterstützung zum Drucken/Scannen Windows booten zu müssen, keine gute Banking- und Steuersoftware zu bekommen und vom Hardwaresupport meines damaligen Dell XPS will ich gar nicht sprechen. Ich habe zunächst an meinem privaten Arbeitsplatz auf einen 27″ iMac umgestellt und war so zufrieden mit Hard- wie Software, das ich beim Wechsel meines Arbeitgebers direkt auch beruflich auf ein 13″ MacbookPro umgestellt habe. Auch hierum könnte es hier in Zukunft also ab und an gehen, aber das OSX natürlich im Kern noch immer ein BSD ist überschneiden sich hier viele Dinge mit Linux und gerade Commandline Tools sind häufig gleich.

Ubuntu XAMPP und MySQL Workbench

Ubuntu XAMPP und MySQL Workbench

Ich nutze als Entwicklungsdatenbank gerne ein XAMPP Paket und stieß nun auf ein Problem als ich mit der MySQL Workbench einen Dump einer anderen DB lokal einspielen wollte. Ich konnte meine lokale DB zwar auslesen aber die zum einfügen benötigte SOCKS Verbindung wurde mit folgender Fehlermeldung abgelehnt:

Can’t connect to local MySQL server through socket ‚/var/run/mysqld/mysqld.sock

Das ist soweit auch richtig, denn unter /var/run/mysqld würde normalerweise der MySQL Daemon sitzen wenn ich ihn aus den Paketquellen installieren würde. Da ich aber XAMPP verwende liegt dieser unter /opt/lampp/var/mysql/mysql.sock. Da ich keine Möglichkeit gefunden dies der Workbench irgendwo einmal zentral mitzuteieln habe ich einfach mit

sudo mkdir /var/run/mysqld

ln -sf /opt/lampp/var/mysql/mysql.sock /var/run/mysqld/mysqld.sock

einen Link erstellt. Nun ist Workbench auch zufrieden und das importieren hat geklappt.

Update: zu beachten ist hierbei das der Link nach jedem Neustart wieder weg ist und neu angelegt werden muss. Um dies zu vereinfachen kann man die nötigen Shellbefehle in ein Shellskript verpacken und dieses per Autostart bei jedem Neustart ausführen lassen.

Die Ärzte in Hannover und das offizielle Bootleg

Die Ärzte in Hannover und das offizielle Bootleg

Am 04.07 war ich auf dem “Die Ärzte” Konzert in der proppevollen TUI Arena in Hannover. Zum Konzert selbst brauch ich nicht viel zu sagen, ich denke wenn man die Band nur halbwegs mag sollte man da unbedingt mal hingehen. Live sind sie immer wieder ein Knaller und interpretieren ihre Songs auch rockiger als auf den Alben. Es ist immer laut, lang, gut und einfach Rock n Roll. Die Vorband Sator kannte ich bis dato noch nicht, war aber auch sehr in Ordnung.

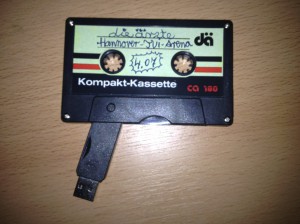
Was mich aber sehr gefreut hat war das die Ärzte etwas umsetzen worüber ich mich schon seit Jahren immer mal wieder mit Musikern, Textern etc. unterhalten habe und noch nie verstanden habe wieso das niemand macht. Es gab neben dem ganzen üblichen Merchandise einen Stand an dem sich Gutscheinkarten kaufen ließen. Für diesen Gutschein bekam man dann, direkt nach dem Konzert, einen USB Stick in Form einer Musikkassette und einen Downloadcode. Der Stick ist mit ca. dem halben Konzert in Form von MP3s (320kbit/s) bespielt und den Rest gibt es den nächsten Tag als Download. Somit begegnet man den illegalen Bootlegs, macht diese wertlos und hat einen Mehrwert geschaffen um wieder Geld für Musik auszugeben, denn es ist eben der Abend an dem man selbst dabei war und eine bleibende Erinnerung. Die Songs dieses Abends laufen so nicht im Radio und sind sicher auch in Tauschbörsen schwerer zu finden. Der Stick in Form einer Kassette ist zudem noch ein sehr außergewöhnliches Andenken und Musik direkt als MP3 zu verkaufen find ich ebenfalls klasse da die CD eh ein Auslaufmodell ist.