Browsed by
Tag: OSX

Path environment variable at IntelliJ on macOS

Path environment variable at IntelliJ on macOS

intellij-ideaLately I encountered a problem with IntelliJ on macOS I wasn’t aware of so far. For a new project I joined it was necessary to let Java execute a shell script which resides in /usr/local/bin and calls another script. Putting all the questions for the reason behind this aside I was pretty puzzled when I couldn’t get this to work while on all my colleagues Linux machines it worked like a charm.
After fiddling around with it for a while it became very much clear that the JVM which I started from IntelliJ didn’t had /usr/local/bin in its PATH environment variable and because of that couldn’t execute the script. The question was why this was the case. When I started the application via gradle on the shell everything worked correct which seemed to point to an IntelliJ problem. After some research it became clear that the root cause of the problem is a concept in macOS which separates the shell environment variables from the environment variables for GUI processes, or better said the environment variables for processes which are started from Spotlight, Finder or the desktop.
The standard environment variables set for GUI applications on macOS are controlled via launchctl and are per default set to /usr/bin:/bin:/usr/sbin:/sbin.

The quick solution to get around this and use the environment variables set in the Shell via .bashrc or .zshrc etc. is to start IntelliJ (or any other UI application) via the command line. This can be done on with the command

open /Applications/IntelliJ\ IDEA.app

After that IntelliJ runs in the shell context and has access to all the variables set there. If this doesn’t suit you and you want a more permanent solution which makes it possible to start IntelliJ without the shell and still have access to the environment variables there is a solution for that, too.
You have to create the file ~/Library/LaunchAgents/environment.plist. A plist file in macOS is a property list file which is a widely used concept in macOS (read more about it here). In this file there can be some startup configurations stored. A minimal configuration to just control the environment variables could look like this:
Read More Read More

Automation via shell aliases

Automation via shell aliases

terminal-appWhen working on software development projects there are many repetitive tasks to do, may it be the deployment of a binary, starting of different servers in docker containers or standalone, the exchange of config files for different environments, the migration of a database or something simple as the navigation to deep paths on the command line to do some editings or server starts there. All this tasks can be annoying and over time they add up to a significant amount of time which is not very productive. The logical counter measure for a developer should be to automate as much as possible of this recurring tasks. For example you can bundle up the start of different docker containers via docker compose or delegate some tasks to a CI server but in the end some tasks will remain which you have to trigger manually -at least on your development machine- which is where your shell can become handy with a feature called ‘alias’. An alias is an automation feature which at least every popular Linux/Unix/macOS shell provides. With an alias you can define a new command that executes a series of shell commands completely automatic.
I have a rule of thumb defined where I try to automate every manual task by an alias which I have to do at a minimum of three times a week (to be honest I also do an alias if I have to do a task two times every week just because it is such a handy feature).
To define a new alias all you have to do is to add it to the config file of your shell. In the case of the very popular bash shell this file is called .bashrc (on macOS you have to use the .bash_profile file when you use bash) while for zsh it is called .zshrc but in both cases the file sits in the users home folder. All you have to do is to open your rc file with an text editor, scroll to the end and add a new line starting with the keyword ‘alias’ followed by the alias name you chose and the command that should be executed. A sample command could look like this:

alias cdwildfly="cd ~/programming/java/servers/wildfly/"

Read More Read More

Find and kill a process on a specific port (lsof)

Find and kill a process on a specific port (lsof)

terminal-app
You might all have experienced the situation when you want to start a server either from within your IDE or via the terminal to only get the error that the “port is already in use” and the startup is aborted. This is mostly caused by aborting the server or a crash of the IDE which started it and not terminating it properly. When using macOS (or any other BSD or a Linux) there is a simple solution for this.

For such purposes macOS comes with the “lsof” command which stands for “list open files”. Its purpose is to show who is using a specific file or in our case who is using a specific port. After identifying the process it is easy to terminate it using the “kill” command.

Read More Read More

Solution for the IntelliJ issue on macOS Sierra

Solution for the IntelliJ issue on macOS Sierra

intellij-idea
Jetbrains has come up with a solution for the scrolling problem with IntelliJ IDEA based IDEs under macOS Sierra. They released a modified JDK8 which hast to be set as boot JDK for IntelliJ. You can download the JDK here.
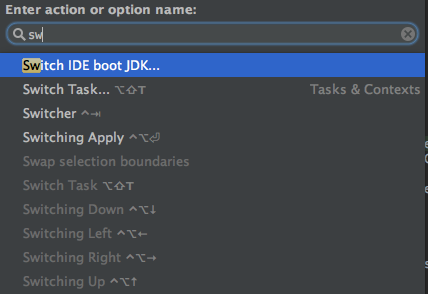
For setting it as the boot JDK you need to got to action menu. This is reached under macOS by pressing ⌘ + ⇧ + a (in other words cmd + shift + a) buttons and entering in the search box the term “switch IDE boot JDK”.
intellij-switch-jdk
The new JDK will be part of the next stable release of IntelliJ and is actually available as part of the 2016.3 EAP.
As this seems to fix the scrolling issue there are still reports of problems with the context click behavior.

Dropbox der Webspeicher den jeder brauchen kann

Dropbox der Webspeicher den jeder brauchen kann

Ich bin normalerweise nicht so wahnsinnig schnell begeistert von allen möglichen Web Apps, aber Dropbox muss ich nun doch mal erwähnen weil ich den Dienst für so unglaublich nützlich halte das ihn sich beinahe jeder mal ansehen sollte.

Worum gehts bei Dropbox? Ganz einfach, Dropbox stellt einem zunächst mal Speicher im Netz bereit und zwar genau 2 GB für einen kostenlosen Account. Wem das nicht reicht der kann gegen eine Gebühr auch upgraden, aber für mich ist das mehr als genug. Nun ist der Speicher ansich erstmal nichts besonderes, aber Dropbox bietet einen ausgeklügelten Client an den es für ALLE gängigen Betriebssysteme (Windows, Mac OS, Linux) gibt. Installiert man diese Software wird ein Ordner mit dem Namen “Dropbox” auf der Festplatte angelegt. Dieser ist eine Verknüpfung mit dem Online Speicher. Egal was ich nun in den Ordner packe, es wird automatisch mit dem Online Speicher Synchronisiert ohne das ich einen Browser oder ein FTP Programm, oder sonstwas bräuchte.

Read More Read More