Lately I encountered a problem with IntelliJ on macOS I wasn’t aware of so far. For a new project I joined it was necessary to let Java execute a shell script which resides in /usr/local/bin and calls another script. Putting all the questions for the reason behind this aside I was pretty puzzled when I couldn’t get this to work while on all my colleagues Linux machines it worked like a charm.
After fiddling around with it for a while it became very much clear that the JVM which I started from IntelliJ didn’t had /usr/local/bin in its PATH environment variable and because of that couldn’t execute the script. The question was why this was the case. When I started the application via gradle on the shell everything worked correct which seemed to point to an IntelliJ problem. After some research it became clear that the root cause of the problem is a concept in macOS which separates the shell environment variables from the environment variables for GUI processes, or better said the environment variables for processes which are started from Spotlight, Finder or the desktop. The standard environment variables set for GUI applications on macOS are controlled via launchctl and are per default set to /usr/bin:/bin:/usr/sbin:/sbin.
The quick solution to get around this and use the environment variables set in the Shell via .bashrc or .zshrc etc. is to start IntelliJ (or any other UI application) via the command line. This can be done on with the command
open /Applications/IntelliJ\ IDEA.app
After that IntelliJ runs in the shell context and has access to all the variables set there. If this doesn’t suit you and you want a more permanent solution which makes it possible to start IntelliJ without the shell and still have access to the environment variables there is a solution for that, too. You have to create the file ~/Library/LaunchAgents/environment.plist. A plist file in macOS is a property list file which is a widely used concept in macOS (read more about it here). In this file there can be some startup configurations stored. A minimal configuration to just control the environment variables could look like this:
You might all have experienced the situation when you want to start a server either from within your IDE or via the terminal to only get the error that the “port is already in use” and the startup is aborted. This is mostly caused by aborting the server or a crash of the IDE which started it and not terminating it properly. When using macOS (or any other BSD or a Linux) there is a simple solution for this.
For such purposes macOS comes with the “lsof” command which stands for “list open files”. Its purpose is to show who is using a specific file or in our case who is using a specific port. After identifying the process it is easy to terminate it using the “kill” command. …
Using a remote subversion repository with git locally requires some adoptions to the local git usage compared to working in a pure git environment. The reason for this is that the remote subversion don’t know about many of the concepts the local git supports (local branches or multiple local commits before checkin for example). Because of this it is essential to make it look as close to a normal svn checkin as possible when using git svn.
As I now work since quite a while with such a setup I defined a workflow for me that don’t causes any problems with the svn and gives me many of the benefits I have with git as there are the possibility to work with the version history offline, making local branches to develop new features or making multiple commits when sub tasks are done.
Before starting to develop a new feature I need to make sure everything is up to date. In contrast to a git remote repository no pull option is available here but I have to rebase the svn repository. I call the following from the master branch:
git svn rebase
This gets any new code changes from the svn and rebases all local work done by me which is not checked in yet on top of it. This is essential because svn history goes in a straight line and would not know what to do if you push a local commit that is dated before the actual newest check in.
After having done that I can create a local feature branch using
git checkout -b newFeature
Here everything works as normal. You can make commits, branch out further, go back to a former version and so on. When you want to get the newest code from the remote repository merged into your branch I prefer pulling it in the master first and rebasing it from there in my featureBranch (it is important not to merge it)
git checkout master
git svn rebase
git checkout featureBranch
git rebase master
When the new feature is ready comes the essential part where the git svn mix breaks sometimes if you don’t do it right. As I mentioned it is essential to make the commit as equal to a svn commit as possible. When using svn you don’t have the possibility to make local commits you just push everything at once to the server where it gets a version id and thats it. To achieve that behaviour with git you change back to the master, checkout the newest code changes and merge it back to the feature branch as explained above. After that we can merge the feature branch back to master:
git checkout master
git merge featureBranch
When you look at the version history now you will see that every commit done in the feature branch is now at the top of the version history. This is because we rebased the master in the feature branch and not merged it. This gives us now the possibility to pack all our local commits to one commit which will then look like the normal subversion workflow to the repository. If we had done 5 commits in our local feature branch for example we achieve this with
git rebase --interactive master~5
This will guide you through two steps. In the first you have to select which of the five commits you want to squash together. Here you should squash all subsequent commits into the first. After that a new dialogue will open which needs you to define the new commit message. Here you see all commit messages you entered in the single commits and can copy the contents to a new single message. When you are done and saved the new message git will rebase everything to one commit which lies on top in the version history. The only thing left to do is push it to svn. Once again the usual git push won’t work here. Instead we call
git svn dcommit
That is all. Everything should work fine and your new feature is checked in to subversion. You can now delete the feature branch or keep to track back the single steps you made to develop the feature.
Update:
Just to clarify, the idea is not to work weeks long on a feature and try to integrate it with a big bang all at once. This was just meant for small features that require just a few hours or maybe a day of work. If you implement a larger feature you obviously should commit smaller portions of your code changes to svn to make your progress clear and reproducible and avoid large merge conflicts with other team mates changes. In the beginning I tried to dcommit all my single commits to svn which worked to a point but had one nearly fatal break. Since then I try to avoid that and use the described workflow.
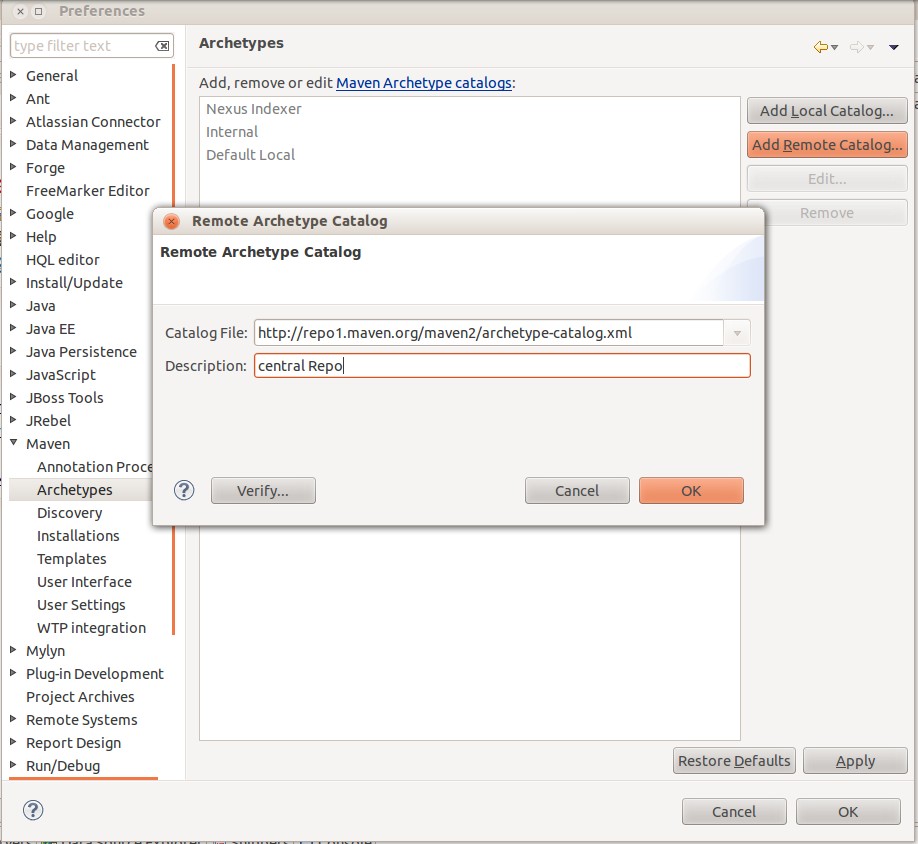
Wer sich schon immer gefragt hat wieso auch bei installiertem m2eclipse Maven-Plugin nur eine minimale Auswahl an verschiedenen Archetypes in Eclipse zur Verfügung steht kann diese Auswahl ganz einfach manuell erweitern. Dazu muss im Eclipse das Maven Archetype Menü geöffnet werden:
Window > Preferences > Maven > Archetype
Dort kann unter der Option Add Remote Catalog ein beliebiges Repository eingetragen werden. Am sinnvollsten ist hier das Maven Central hinzuzufügen (http://repo1.maven.org/maven2/archetype-catalog.xml). Nun sollten etliche neue Archetypes zur Verfügung stehen.