As I’m a huge fan of IntelliJ IDEA I don’t use eclipse very often during the last years but I have a dedicated project where I need to regularly use for creating deployments and connect with some remote test servers. So I have to deal with eclipse and its problems, too. A recurring problem for me with eclipse is that it stumbles upon its own not cleaned up metadata which causes problems that are not obvious to solve at first sight. Most of them are gladly quick to fix if you know what you have to do.
A common problem of that sort is when, after selecting the workspace, eclipse fires up a popup with the message “The default workspace … is in use or cannot be created. Please choose a different one”. Most of the time the workspace is not in use but the problem can be caused by an unexpected closing of eclipse which prevents it from cleaning up its metadata correctly. The solution for this is easy. Just navigate to the workspace folder and delete the .lock file in the hidden .metadata directory..
If you are using a mac like me the easiest way is to do it on the shell because the finder by default doesn’t show hidden folders.
cd ~/yourWorkspaceDirectory/.metadata
rm .lock
Now eclipse should start with your workspace as expected.
Using CellUtil with POI to avoid too many cell styles in Excel
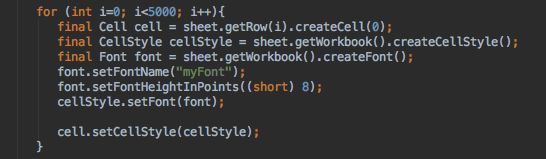
When you create Excel documents with the popular Apache POI library it is possible that you encounter a problem where Excel tells you there are “Too many different cell formats”. A possible source for this is that you probably have a loop structure in which you define a new cell style for every cell you create.
Excel is limited in the amount of cell styles it can handle in a single document (4000 per document). Therefore the above code would break. The easy fix would be to define the cell style outside of your loop and reuse it.
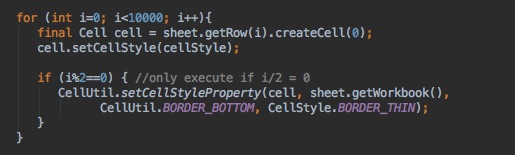
But sometimes you want to create different cell styles depending on a line number for example. In this case POI comes with a handy utility class named CellUtil that allows you to modify existing cell styles without creating a new one. Internally it has to create a new cell style and saves it in a map. If you make the same modification at any other place in your code again it will iterate that map, find the previously created style and reuses it. Therefore the same style is only created once. The usage is quite simple and would adapt to the sample above as follows
The code above will add a border to the bottom of every second cell created but because it is every time the same modification CellUtil will only create one additional style and apply this every time again.
Using a remote subversion repository with git locally requires some adoptions to the local git usage compared to working in a pure git environment. The reason for this is that the remote subversion don’t know about many of the concepts the local git supports (local branches or multiple local commits before checkin for example). Because of this it is essential to make it look as close to a normal svn checkin as possible when using git svn.
As I now work since quite a while with such a setup I defined a workflow for me that don’t causes any problems with the svn and gives me many of the benefits I have with git as there are the possibility to work with the version history offline, making local branches to develop new features or making multiple commits when sub tasks are done.
Before starting to develop a new feature I need to make sure everything is up to date. In contrast to a git remote repository no pull option is available here but I have to rebase the svn repository. I call the following from the master branch:
git svn rebase
This gets any new code changes from the svn and rebases all local work done by me which is not checked in yet on top of it. This is essential because svn history goes in a straight line and would not know what to do if you push a local commit that is dated before the actual newest check in.
After having done that I can create a local feature branch using
git checkout -b newFeature
Here everything works as normal. You can make commits, branch out further, go back to a former version and so on. When you want to get the newest code from the remote repository merged into your branch I prefer pulling it in the master first and rebasing it from there in my featureBranch (it is important not to merge it)
git checkout master
git svn rebase
git checkout featureBranch
git rebase master
When the new feature is ready comes the essential part where the git svn mix breaks sometimes if you don’t do it right. As I mentioned it is essential to make the commit as equal to a svn commit as possible. When using svn you don’t have the possibility to make local commits you just push everything at once to the server where it gets a version id and thats it. To achieve that behaviour with git you change back to the master, checkout the newest code changes and merge it back to the feature branch as explained above. After that we can merge the feature branch back to master:
git checkout master
git merge featureBranch
When you look at the version history now you will see that every commit done in the feature branch is now at the top of the version history. This is because we rebased the master in the feature branch and not merged it. This gives us now the possibility to pack all our local commits to one commit which will then look like the normal subversion workflow to the repository. If we had done 5 commits in our local feature branch for example we achieve this with
git rebase --interactive master~5
This will guide you through two steps. In the first you have to select which of the five commits you want to squash together. Here you should squash all subsequent commits into the first. After that a new dialogue will open which needs you to define the new commit message. Here you see all commit messages you entered in the single commits and can copy the contents to a new single message. When you are done and saved the new message git will rebase everything to one commit which lies on top in the version history. The only thing left to do is push it to svn. Once again the usual git push won’t work here. Instead we call
git svn dcommit
That is all. Everything should work fine and your new feature is checked in to subversion. You can now delete the feature branch or keep to track back the single steps you made to develop the feature.
Update:
Just to clarify, the idea is not to work weeks long on a feature and try to integrate it with a big bang all at once. This was just meant for small features that require just a few hours or maybe a day of work. If you implement a larger feature you obviously should commit smaller portions of your code changes to svn to make your progress clear and reproducible and avoid large merge conflicts with other team mates changes. In the beginning I tried to dcommit all my single commits to svn which worked to a point but had one nearly fatal break. Since then I try to avoid that and use the described workflow.
Everyone who has worked with git for some time and has to go back to subversion will experience the feeling that subversion is doing so many things wrong and making things unnecessary
complicated. Luckily git comes with a build in svn bridge which enables us to work local with git while on the server side nobody will see a difference to any other svn client.
To start working with git we need to checkout the svn repository. Therefore a empty folder has to be created locally which is not under git control currently. Therefore type on your shell:
mkdir gitTest
After that change to that folder and perform the checkout/clone:
cd gitTest

git svn clone https://192.168.178.1/svn/MyRepo -T trunk -t tags
The IP 192.168.178.1 has to be replaced by the IP of the subversion repository. The option -T trunk -t tags tell git that we want to checkout the trunk only (which is a folder on the svn repository named “trunk”) with the svn tags. For a full clone with all branches etc the option -stdlayout is needed:
Ich nutze als Entwicklungsdatenbank gerne ein XAMPP Paket und stieß nun auf ein Problem als ich mit der MySQL Workbench einen Dump einer anderen DB lokal einspielen wollte. Ich konnte meine lokale DB zwar auslesen aber die zum einfügen benötigte SOCKS Verbindung wurde mit folgender Fehlermeldung abgelehnt:
Can’t connect to local MySQL server through socket ‚/var/run/mysqld/mysqld.sock
Das ist soweit auch richtig, denn unter /var/run/mysqld würde normalerweise der MySQL Daemon sitzen wenn ich ihn aus den Paketquellen installieren würde. Da ich aber XAMPP verwende liegt dieser unter /opt/lampp/var/mysql/mysql.sock. Da ich keine Möglichkeit gefunden dies der Workbench irgendwo einmal zentral mitzuteieln habe ich einfach mit
einen Link erstellt. Nun ist Workbench auch zufrieden und das importieren hat geklappt.
Update: zu beachten ist hierbei das der Link nach jedem Neustart wieder weg ist und neu angelegt werden muss. Um dies zu vereinfachen kann man die nötigen Shellbefehle in ein Shellskript verpacken und dieses per Autostart bei jedem Neustart ausführen lassen.